
| English | 한글 |
Alarm
Application’s status is periodically checked and alarm is triggered if certain pre-configured conditions (rules) are satisfied.
pinpoint-batch server checks every 3 minutes based on the last 5 minutes of data. And if the conditions are satisfied, it sends sms/email/webhook to the users listed in the user group.
If an email/sms/webhook is sent everytime when a threshold is exceeded, we felt that alarm message would be spammable.
Therefore we decided to gradually increase the transmission frequency for alarms.
ex) If an alarm occurs continuously, transmission frequency is increased by a factor of two. 3 min -> 6min -> 12min -> 24min
NOTICE!
batch was run in the background of pinpoint-web server until v2.2.0 From v2.2.1 it will be dealt with in pinpoint-batch server. Since the batch logic(code) in pinpoint-web will be deprecated in the future, we advice you to transfer the execution of batch to pinpoint-batch server.
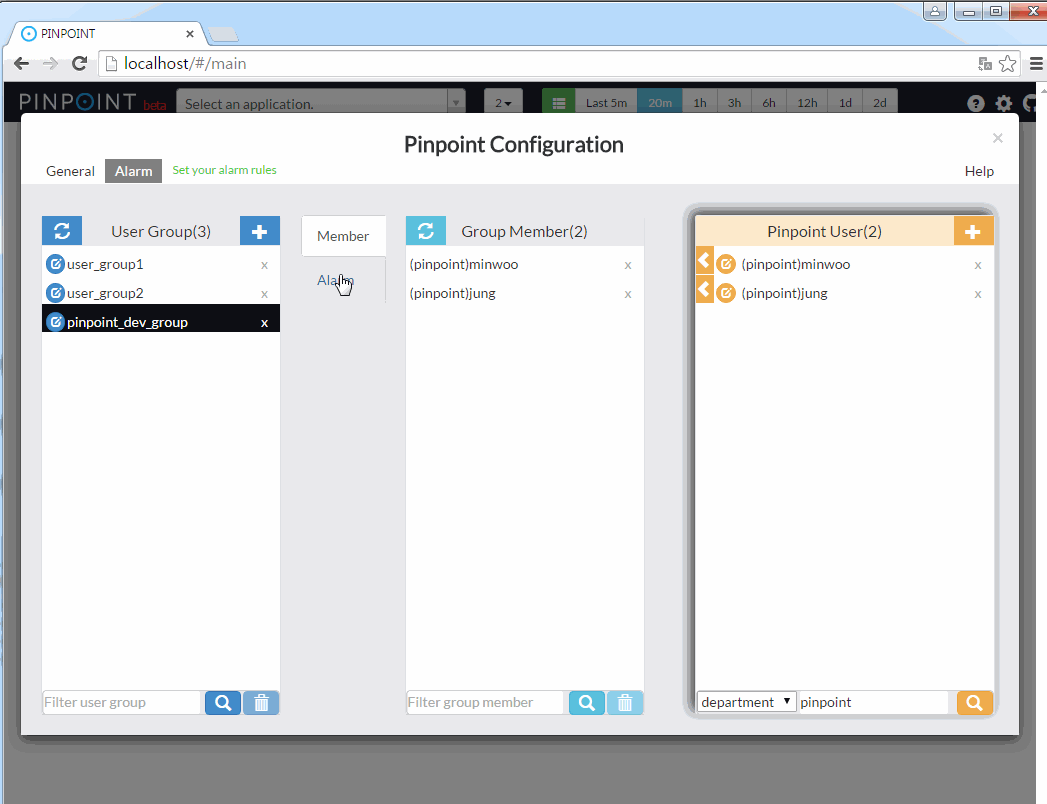
1. User Guide
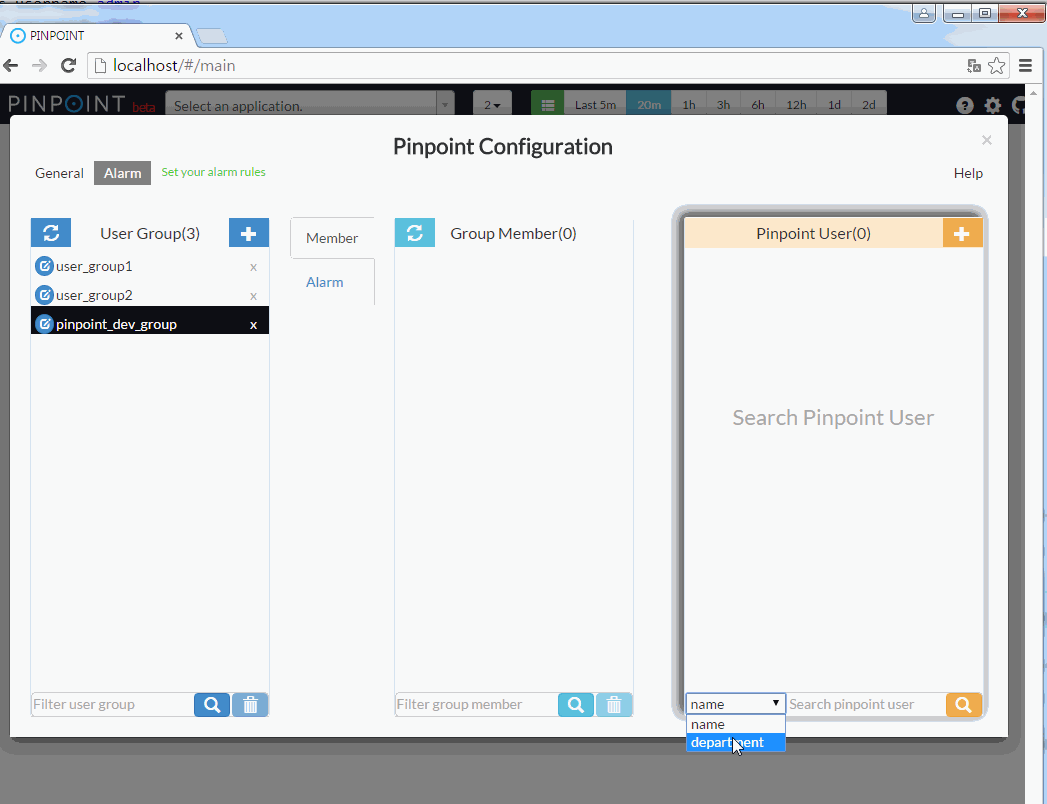
1) Configuration menu
2) Registering users
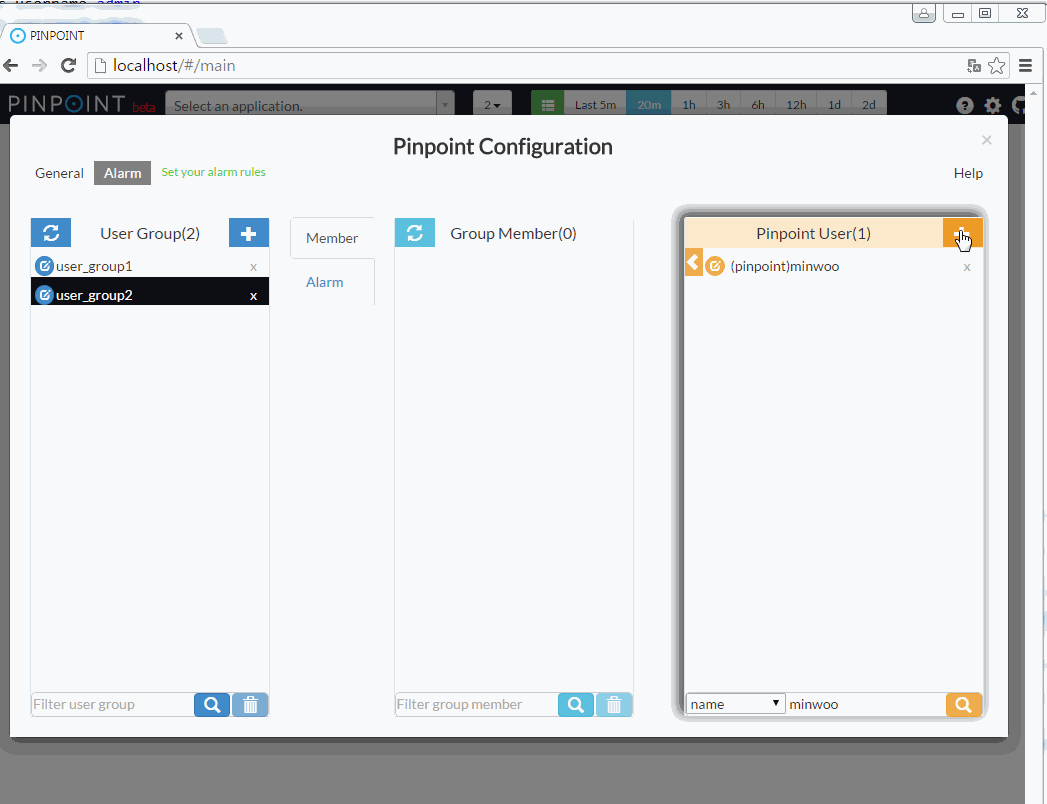
3) Creating user groups
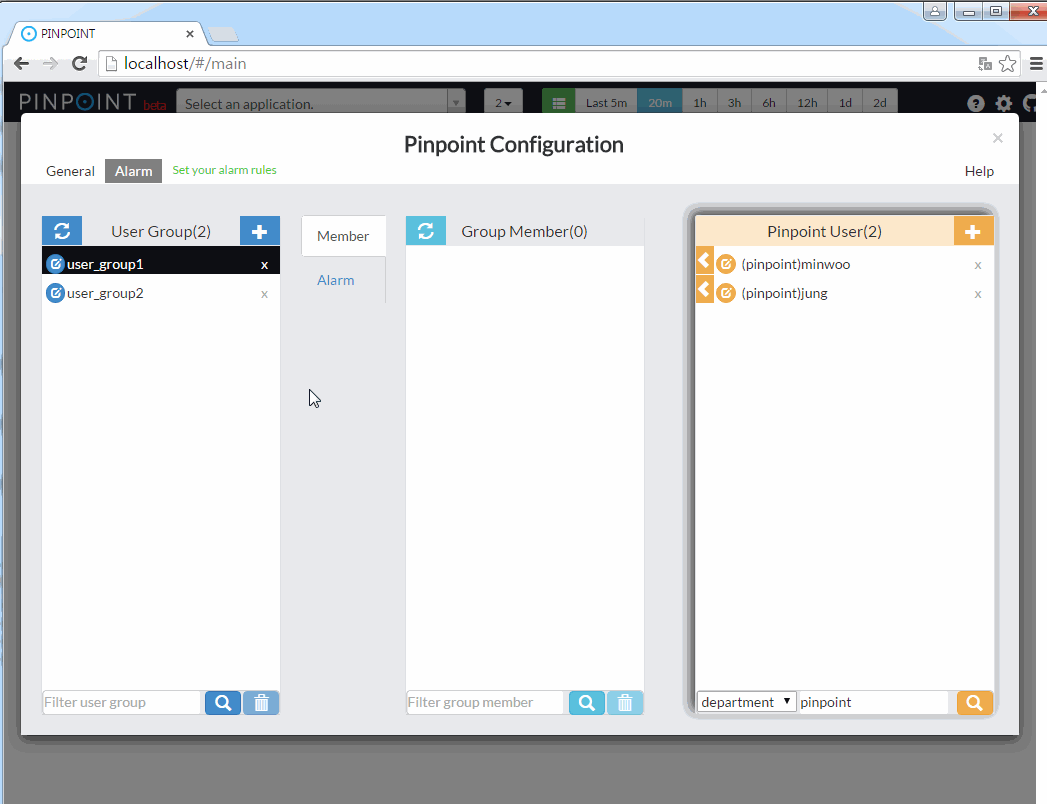
4) Adding users to user group
5) Setting alarm rules
Alarm Rules
SLOW COUNT
   Triggered when the number of slow requests sent to the application exceeds the configured threshold.

SLOW RATE
   Triggered when the percentage(%) of slow requests sent to the application exceeds the configured threshold.

ERROR COUNT
   Triggered when the number of failed requests sent to the application exceeds the configured threshold.

ERROR RATE
   Triggered when the percentage(%) of failed requests sent to the application exceeds the configured threshold.

TOTAL COUNT
   Triggered when the number of all requests sent to the application exceeds the configured threshold.

SLOW COUNT TO CALLEE
   Triggered when the number of slow requests sent by the application exceeds the configured threshold.
   You must specify the domain or the address(ip, port) in the configuration UI's "Note..." box
   ex) www.naver.com, 127.0.0.1:8080

SLOW RATE TO CALLEE
   Triggered when the percentage(%) of slow requests sent by the application exceeds the configured threshold.
   You must specify the domain or the address(ip, port) in the configuration UI's "Note..." box
   ex) www.naver.com, 127.0.0.1:8080

ERROR COUNT TO CALLEE
   Triggered when the number of failed requests sent by the application exceeds the configured threshold.
   You must specify the domain or the address(ip, port) in the configuration UI's "Note..." box
   ex) www.naver.com, 127.0.0.1:8080

ERROR RATE TO CALLEE
   Triggered when the percentage(%) of failed requests sent by the application exceeds the configured threshold.
   You must specify the domain or the address(ip, port) in the configuration UI's "Note..." box
   ex) www.naver.com, 127.0.0.1:8080

TOTAL COUNT TO CALLEE
   Triggered when the number of all requests sent by the application exceeds the configured threshold.
   You must specify the domain or the address(ip, port) in the configuration UI's "Note..." box
   ex) www.naver.com, 127.0.0.1:8080

HEAP USAGE RATE
   Triggered when the application's heap usage(%) exceeds the configured threshold.

JVM CPU USAGE RATE
   Triggered when the application's CPU usage(%) exceeds the configured threshold.

SYSTEM CPU USAGE RATE
   Sends an alarm when the application's CPU usage(%) exceeds the configured threshold.

DATASOURCE CONNECTION USAGE RATE
   Triggered when the application's DataSource connection usage(%) exceeds the configured threshold.

FILE DESCRIPTOR COUNT
   Sends an alarm when the number of open file descriptors exceeds the configured threshold.
2. Configuration & Implementation
Alarms generated by Pinpoint can be configured to be sent over email, sms and webhook.
Sending alarms over email is simple - you will simply need to configure the property file. Sending alarms over sms requires some implementation. Read on to find out how to do this. The alarm using webhook requires an webhook receiver service to get webhook messages. You should implement the webhook receiver service - which is not provided by Pinpoint, or You can use the sample project
Few modifications are required in pinpoint-batch and pinpoint-web to use the alarm feature. Add some implementations and settings in pinpoint-batch. Configure Pinpoint-web for user to set an alarm settings.
2.1 Configuration & Implementation in pinpoint-batch
2.1.1) Email configuration, sms and webhook implementation
A. Email alarm service
To use the mailing feature, you need to configure the SMTP server information and information to be included in the email in the batch-root.properties file.
pinpoint.url= #pinpoint-web server url
alarm.mail.server.url= #smtp server address
alarm.mail.server.port= #smtp server port
alarm.mail.server.username= #username for smtp server authentication
alarm.mail.server.password= #password for smtp server authentication
alarm.mail.sender.address= #sender's email address

ex)
pinpoint.url=http://pinpoint.com
alarm.mail.server.url=stmp.server.com
alarm.mail.server.port=587
alarm.mail.server.username=pinpoint
alarm.mail.server.password=pinpoint
alarm.mail.sender.address=pinpoint_operator@pinpoint.com
The class that sends emails is already registered as Spring bean in applicationContext-batch-sender.xml.
    <bean id="mailSender" class="com.navercorp.pinpoint.batch.alarm.SpringSmtpMailSender">
        <constructor-arg ref="batchConfiguration"/>
        <constructor-arg ref="userGroupService"/>
        <constructor-arg ref="javaMailSenderImpl"/>
    </bean>

    <bean id="javaMailSenderImpl" class="org.springframework.mail.javamail.JavaMailSenderImpl">
        <property name="host" value="${alarm.mail.server.url:}" />
        <property name="port" value="${alarm.mail.server.port:587}" />
        <property name="username" value="${alarm.mail.server.username:}" />
        <property name="password" value="${alarm.mail.server.password:}" />
        <property name="javaMailProperties">
            <props>
                <prop key="mail.transport.protocol">${alarm.mail.transport.protocol:}</prop>
                <prop key="mail.smtp.port">${alarm.mail.smtp.port:}</prop>
                <prop key="mail.smtp.from">${alarm.mail.sender.address:}</prop>
                <prop key="mail.smtp.auth">${alarm.mail.smtp.auth:false}</prop>
                <prop key="mail.smtp.starttls.enable">${alarm.mail.smtp.starttls.enable:false}</prop>
                <prop key="mail.smtp.starttls.required">${alarm.mail.smtp.starttls.required:false}</prop>
                <prop key="mail.debug">${alarm.mail.debug:false}</prop>
            </props>
        </property>
    </bean>
If you would like to implement your own mail sender, simply replace the SpringSmtpMailSender, JavaMailSenderImpl beans above with your own implementation that implements com.navercorp.pinpoint.web.alarm.MailSender interface.
public interface MailSender {
   void sendEmail(AlarmChecker checker, int sequenceCount);
}
B. Sms alarm service
To send alarms over sms, you will need to implement your own sms sender by implementing com.navercorp.pinpoint.batch.alarm.SmsSender interface.
If there is no SmsSender implementation, then alarms will not be sent over sms.
public interface SmsSender {
    public void sendSms(AlarmChecker checker, int sequenceCount);
}
C. Webhook alarm service
Webhook alarm service is a feature that can transmit Pinpoint’s alarm message through Webhook API.
The webhook receiver service that receives the webhook message should be implemented by your own, or use a sample project provided (in this case Slack).
The alarm messages(refer to as payloads) sent to webhook receiver have the different schema depending on the Alarm Checker type. You can see the payload schemas in 3.Others - The Specification of webhook payloads and the examples.
To enable the webhook alarm service, You need to configure webhook.enable and webhook.receiver.url in batch-root.properties file.
# webhook config
webhook.enable=true
webhook.receiver.url=http://www.webhookexample.com/alarm/
NOTICE!
As the webhook alarm service has been available from Pinpoint 2.1.1, You should add column ‘webhook_send’ in table ‘alarm_rule’ of pinpoint MYSQL if you updated previous release of Pinpoint 2.2.1.
SQL : ALTER TABLE
alarm_ruleADD COLUMNwebhook_sendCHAR(1) DEFAULT NULL;
The class in charge of sending the webhook is WebhookSenderImpl which Pinpoint provides.
WebhookSender class is added in applicationContext-batch-sender.xml of Pinpoint-batch.
   <bean id="webHookSender" class="com.navercorp.pinpoint.web.alarm.WebhookSenderImpl">
        <constructor-arg ref="batchConfiguration"/>
        <constructor-arg ref="userServiceImpl"/>
        <constructor-arg ref="restTemplate" />
    </bean>
2.1.2) Configuring MYSQL
step 1
Prepare MYSQL Instance to persist the alarm service metadata.
step 2
Set up a MYSQL server and configure connection information in jdbc-root.properties file.
jdbc.driverClassName=com.mysql.jdbc.Driver
jdbc.url=jdbc:mysql://localhost:13306/pinpoint
jdbc.username=admin
jdbc.password=admin
step 3
Create tables for the alarm service. Use below DDL files.
2.1.3) How to execute pinpoint-batch
The pinpoint-batch project is based on spring boot and can be executed with the following command. After build, the executable file is placed under the target/deploy folder of the pinpoint-batch.
java -Dspring.profiles.active=XXXX -jar pinpoint-batch-VERSION.jar

ex) java -Dspring.profiles.active=local -jar pinpoint-batch-2.1.1.jar
2.2 How to configure pinpoint-web
2.2.1) Configuring MYSQL Server IP
In order to persist user alarm settings, set the mysql connection information in jdbc-root.properties file in pinpoint-web.
jdbc.driverClassName=com.mysql.jdbc.Driver
jdbc.url=jdbc:mysql://localhost:13306/pinpoint
jdbc.username=admin
jdbc.password=admin
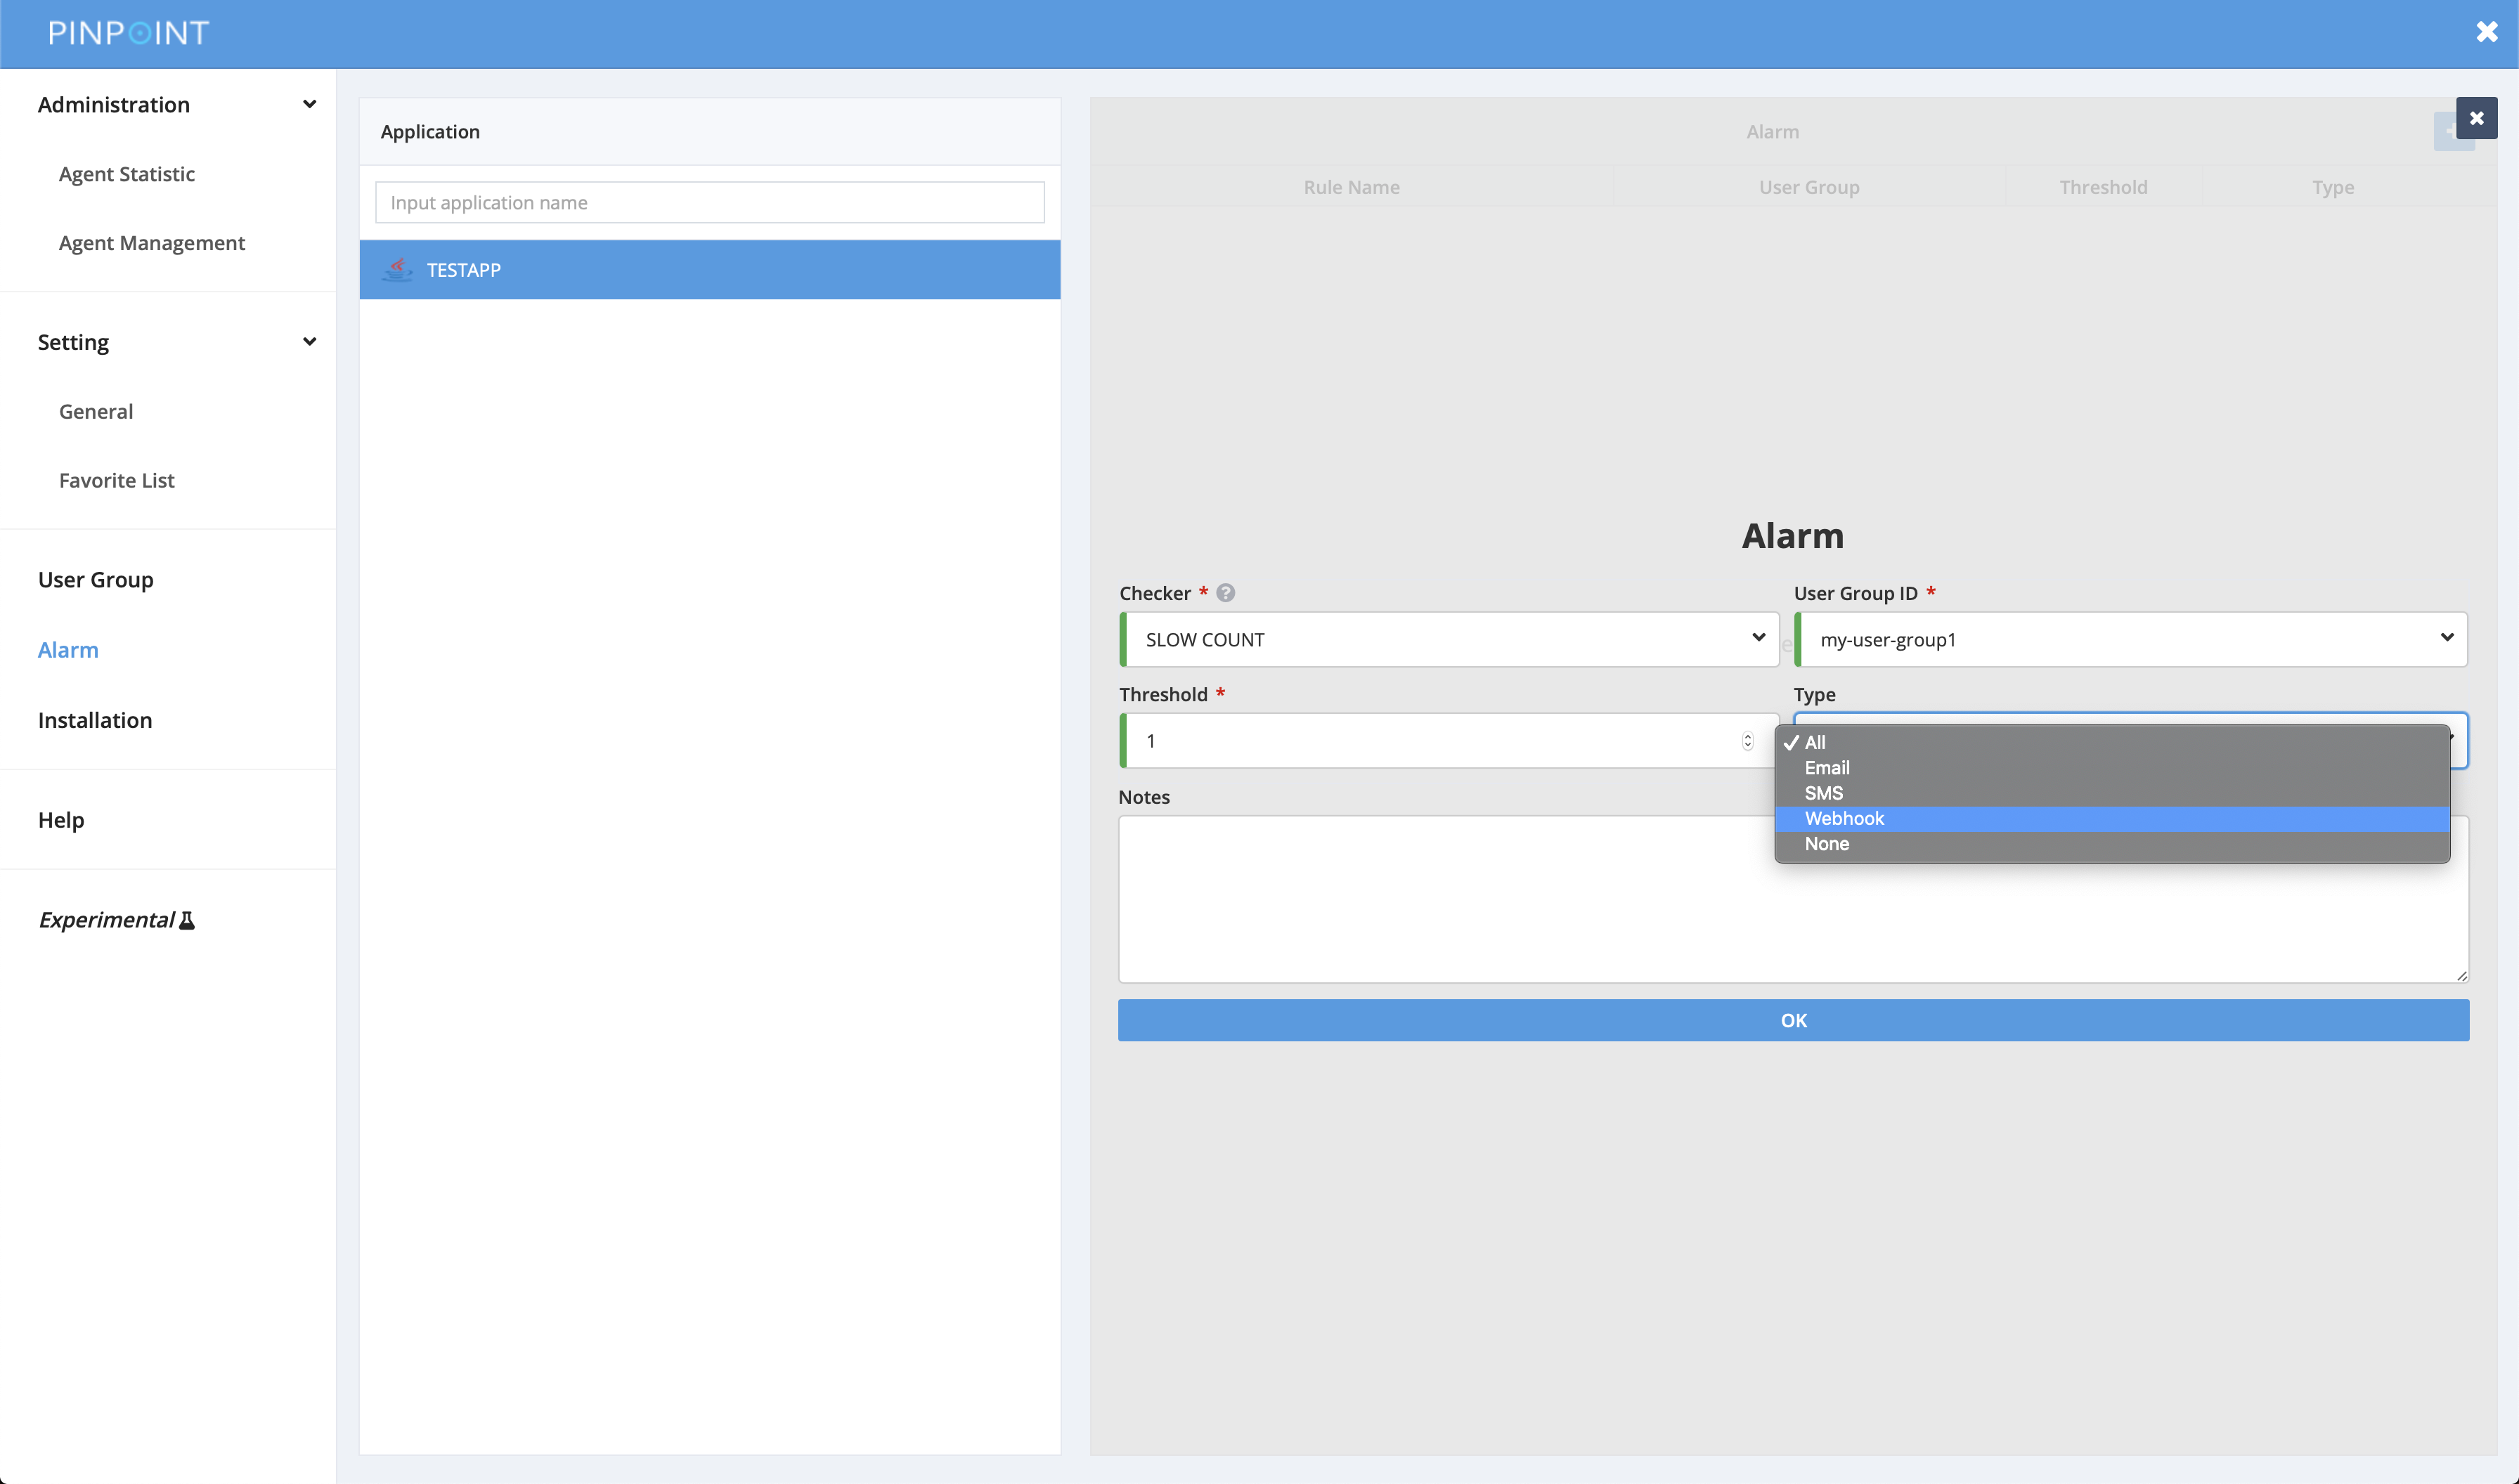
2.2.2) Enabling Webhook Alarm Service
Set webhook.enable in batch-root.properties as true for user to configure the webhook alarm in Alarm menu.
# webhook config
webhook.enable=true
As you enable the webhook alarm service, You can set the webhook as alarm type. See the below.
3. Others
3.1 Configuration, Execution, Performance.
1) You may change the batch execution period by modifying the cron expression in applicationContext-batch-schedule.xml file
<task:scheduled-tasks scheduler="scheduler">
    <task:scheduled ref="batchJobLauncher" method="alarmJob" cron="0 0/3 * * * *" />
</task:scheduled-tasks>
2) Ways to improve alarm batch performance
The alarm batch was designed to run concurrently. If you have a lot of applications with alarms registered, you may increase the size of the executor’s thread pool by modifying pool-size in applicationContext-alarmJob.xml file.
Note that increasing this value will result in higher resource usage.
<task:executor id="poolTaskExecutorForPartition" pool-size="1" />
If there are a lot of alarms registered to applications, you may set the alarmStep registered in applicationContext-alarmJob.xml file to run concurrently.
<step id="alarmStep" xmlns="http://www.springframework.org/schema/batch">
    <tasklet task-executor="poolTaskExecutorForStep" throttle-limit="3">
        <chunk reader="reader" processor="processor" writer="writer" commit-interval="1"/>
    </tasklet>
</step>
<task:executor id="poolTaskExecutorForStep" pool-size="10" />
3) Use quickstart’s web
Pinpoint Web uses Mysql to persist users, user groups, and alarm configurations.
However Quickstart uses MockDAO to reduce memory usage.
Therefore if you want to use Mysql for Quickstart, please refer to Pinpoint Web’s applicationContext-dao-config.xml, jdbc.properties.
3.2 Details on Webhook
3.2.1) webhook receiver sample project
Slack-Receiver is an example project of the webhook receiver. The project can receives alarm of the Pinpoint webhook and sends the message to Slack. If you want more details, see the project repository
3.2.2) The Specification of webhook payloads and the examples
The Schemas of webhook payloads
Key
| Name | Type | Description | Nullable |
|---|---|---|---|
| pinpointUrl | String | Pinpoint-web server URL | O |
| batchEnv | String | Batch server environment variable | X |
| applicationId | String | Alarm target application Id | X |
| serviceType | String | Alarm target application service type | X |
| userGroup | UserGroup | The UserGroup in the user group page | X |
| checker | Checker | The checker info in the alarm setting page | X |
| unit | String | The unit of detected value by checker | O |
| threshold | Integer | The threshold of value detected by checker during a set time | X |
| notes | String | The notes in the alarm setting page | O |
| sequenceCount | Integer | The number of alarm occurence | X |
UserGroup
| Name | Type | Description | Nullable |
|---|---|---|---|
| userGroupId | String | The user group id in the user group page | X |
| userGroupMembers | UserMember[] | Members Info of a specific user group | X |
Checker
| Name | Type | Description | Nullable |
|---|---|---|---|
| name | String | The name of checker in the alarm setting page | X |
| type | String | The type of checker abstracted by value detected by checker “LongValueAlarmChecker” type is the abstracted checker type of “Slow Count”, “Slow Rate”, “Error Count”, “Error Rate”, “Total Count”, “Slow Count To Callee”, “Slow Rate To Callee”, “Error Count To Callee”, “Error Rate To Callee”, “Total Count to Callee”. “LongValueAgentChecker” type is the abstracted checker type of “Heap Usage Rate”, “Jvm Cpu Usage Rate”, “System Cpu Usage Rate”, “File Descriptor Count”. “BooleanValueAgentChecker” type is the abstracted checker type of “Deadlock or not”. “DataSourceAlarmListValueAgentChecker” type is the abstracted checker type of “DataSource Connection Usage Rate”. |
X |
| detectedValue | Integer or DetectedAgent[] | The value detected by checker If “type” is “LongValueAlarmChecker”, “detectedValue” is Integer type. If “type” is not “LongValueAlarmChecker”, “detectedValue” is DetectedAgents[] type. |
X |
UserMember
| Name | Type | Description | Nullable |
|---|---|---|---|
| id | String | Member id | X |
| name | String | Member name | X |
| String | Member email | O | |
| department | String | Member department | O |
| phoneNumber | String | Member phone number | O |
| phoneCountryCode | String | Member phone country code | O |
DetectedAgent
| Name | Type | Description | Nullable |
|---|---|---|---|
| agentId | String | Agent id detected by checker | X |
| agentValue | Integer or Boolean or DataSourceAlarm[] |
The value of Agent detected by checker If “type” is “LongValueAgentChecker”, “agentValue” is Integer type. If “type” is “BooleanValueAgentChecker”,“agentValue” is Boolean type. If “type” is “DataSourceAlarmListValueAgentChecker”, “agentValue” is DataSourceAlarm[] type |
X |
DataSourceAlarm
| Name | Type | Description | Nullable |
|---|---|---|---|
| databaseName | String | The database name connected to application | X |
| connectionValue | Integer | The application’s DataSource connection usage | X |
The Examples of the webhook Payload
LongValueAlarmChecker
{
 "pinpointUrl": "http://pinpoint.com",
 "batchEnv": "release",
 "applicationId": "TESTAPP",
 "serviceType": "TOMCAT",
 "userGroup": {
   "userGroupId": "Group-1",
   "userGroupMembers": [
     {
       "id": "msk1111",
       "name": "minsookim",
       "email": "pinpoint@naver.com",
       "department": "Platform",
       "phoneNumber": "01012345678",
       "phoneCountryCode": 82
     }
   ]
 },
 "checker": {
   "name": "TOTAL COUNT",
   "type": "LongValueAlarmChecker",
   "detectedValue": 33
 },
 "unit": "",
 "threshold": 15,
 "notes": "Note Example",
 "sequenceCount": 4
}
LongValueAgentChecker
{
 "pinpointUrl": "http://pinpoint.com",
 "batchEnv": "release",
 "applicationId": "TESTAPP",
 "serviceType": "TOMCAT",
 "userGroup": {
   "userGroupId": "Group-1",
   "userGroupMembers": [
     {
       "id": "msk1111",
       "name": "minsookim",
       "email": "pinpoint@naver.com",
       "department": "Platform",
       "phoneNumber": "01012345678",
       "phoneCountryCode": 82
     }
   ]
 },
 "checker": {
   "name": "HEAP USAGE RATE",
   "type": "LongValueAgentChecker",
   "detectedValue": [
     {
       "agentId": "test-agent",
       "agentValue": 8
     }
   ]
 },
 "unit": "%",
 "threshold": 5,
 "notes": "Note Example",
 "sequenceCount": 4
}
BooleanValueAgentChecker
{
 "pinpointUrl": "http://pinpoint.com",
 "batchEnv": "release",
 "applicationId": "TESTAPP",
 "serviceType": "TOMCAT",
 "userGroup": {
   "userGroupId": "Group-1",
   "userGroupMembers": [
     {
       "id": "msk1111",
       "name": "minsookim",
       "email": "pinpoint@naver.com",
       "department": "Platform",
       "phoneNumber": "01012345678",
       "phoneCountryCode": 82
     }
   ]
 },
 "checker": {
   "name": "DEADLOCK OCCURRENCE",
   "type": "BooleanValueAgentChecker",
   "detectedValue": [
     {
       "agentId": "test-agent",
       "agentValue": true
     }
   ]
 },
 "unit": "BOOLEAN",
 "threshold": 1,
 "notes": "Note Example",
 "sequenceCount": 4
}
DataSourceAlarmListValueAgentChecker
{
 "pinpointUrl": "http://pinpoint.com",
 "batchEnv": "release",
 "applicationId": "TESTAPP",
 "serviceType": "TOMCAT",
 "userGroup": {
   "userGroupId": "Group-1",
   "userGroupMembers": [
     {
       "id": "msk1111",
       "name": "minsookim",
       "email": "pinpoint@naver.com",
       "department": "Platform",
       "phoneNumber": "01012345678",
       "phoneCountryCode": 82
     }
   ]
 },
 "checker": {
   "name": "DATASOURCE CONNECTION USAGE RATE",
   "type": "DataSourceAlarmListValueAgentChecker",
   "detectedValue": [
     {
       "agentId": "test-agent",
       "agentValue": [
                 {
                     "databaseName": "test",
                     "connectionValue": 32
                 }
        ]
     }
   ]
 },
 "unit": "%",
 "threshold": 16,
 "notes": "Note Example",
 "sequenceCount": 4
}
Alarm
pinpoint는 application 상태를 주기적으로 체크하여 application 상태의 수치가 임계치를 초과할 경우 사용자에게 알람을 전송하는 기능을 제공한다.
application 상태 값이 사용자가 설정한 임계치를 초과하는지 판단하는 batch는 pinpoint-batch에서 동작 한다. alarm batch는 기본적으로 3분에 한번씩 동작이 된다. 최근 5분동안의 데이터를 수집해서 alarm 조건을 만족하면 user group에 속한 user 들에게 sms/email/webhook message를 전송한다.
연속적으로 알람 조건이 임계치를 초과한 경우에 매번 sms/email/webhook를 전송하지 않는다.
알람 조건이 만족할때마다 매번 sms/email/webhook이 전송되는것은 오히려 방해가 된다고 생각하기 때문이다. 그래서 연속해서 알람이 발생할 경우 sms/email/webhook 전송 주기가 점증적으로 증가된다.
예) 알람이 연속해서 발생할 경우, 전송 주기는 3분 -> 6분 -> 12분 -> 24분 으로 증가한다.
알림
batch는 pinpoint 2.2.0 버전까지는 pinpoint-web에서 동작되었지만, 2.2.1 버전 부터는 batch가 pinpoint-batch에서 동작되도록 로직을 분리했다.
앞으로 pinpoint-web의 batch로직은 제거를 할 예정이므로, pinpoint-web에서 batch를 동작시키는 경우 pinpoint-batch에서 batch를 실행하도록 구성하는것을 추천한다.
1. Alarm 기능 사용 방법
1) 설정 화면으로 이동
2) user를 등록
3) userGroup을 생성
4) userGroup에 member를 등록
5) alarm rule을 등록
alarm rule에 대한 설명은 아래를 참고하시오.
SLOW COUNT
   외부에서 application을 호출한 요청 중에 외부서버로 응답을 늦게 준 요청의 개수가 임계치를 초과한 경우 알람이 전송된다.

SLOW RATE
   외부에서 application을 호출한 요청 중에 외부서버로 응답을 늦게 준 요청의 비율(%)이 임계치를 초과한 경우 알람이 전송된다.

ERROR COUNT
   외부에서 application을 호출한 요청 중에 에러가 발생한 요청의 개수가 임계치를 초과한 경우 알람이 전송된다.

ERROR RATE
   외부에서 application을 호출한 요청 중에 에러가 발생한 요청의 비율(%)이 임계치를 초과한 경우 알람이 전송된다.

TOTAL COUNT
   외부에서 application을 호출한 요청 개수가 임계치를 초과한 경우 알람이 전송된다.

SLOW COUNT TO CALLEE
   application 내에서 외부서버를 호출한 요청 중 slow 호출의 개수가 임계치를 초과한 경우 알람이 전송된다.
   설정 화면의 Note 항목에 외부서버의 도메인 이나 주소(ip, port)를 입력해야 합니다. ex) naver.com, 127.0.0.1:8080

SLOW RATE TO CALLEE
   application 내에서 외부서버를 호출한 요청 중 slow 호출의 비율(%)이 임계치를 초과한 경우 알람이 전송된다.
   설정 화면의 Note 항목에 외부서버의 도메인 이나 주소(ip, port)를 입력해야 합니다. ex) naver.com, 127.0.0.1:8080

ERROR COUNT TO CALLEE
   application 내에서 외부서버를 호출한 요청 중 error 가 발생한 호출의 개수가 임계치를 초과한 경우 알람이 전송된다.
   설정 화면의 Note 항목에 외부서버의 도메인 이나 주소(ip, port)를 입력해야 합니다. ex) naver.com, 127.0.0.1:8080

ERROR RATE TO CALLEE
   application 내에서 외부서버를 호출한 요청 중 error 가 발생한 호출의 비율이 임계치를 초과한 경우 알람이 전송된다.
   설정 화면의 Note 항목에 외부서버의 도메인 이나 주소(ip, port)를 입력해야 합니다. ex) naver.com, 127.0.0.1:8080

TOTAL COUNT TO CALLEE
   application 내에서 외부서버를 호출한 요청의 개수가 임계치를 초과한 경우 알람이 전송된다.
   설정 화면의 Note 항목에 외부서버의 도메인 이나 주소(ip, port)를 입력해야 합니다. ex) naver.com, 127.0.0.1:8080

HEAP USAGE RATE
   heap의 사용률이 임계치를 초과한 경우 알람이 전송된다.

JVM CPU USAGE RATE
   applicaiton의 CPU 사용률이 임계치를 초과한 경우 알람이 전송된다.

SYSTEM CPU USAGE RATE
   서버의 CPU 사용률이 임계치를 초과한 경우 알람이 전송된다.

DATASOURCE CONNECTION USAGE RATE
   applicaiton의 DataSource내의 Connection 사용률이 임계치를 초과한 경우 알람이 전송된다.

FILE DESCRIPTOR COUNT
   열려있는 File Descriptor 개수가 임계치를 초가한 경우 알람이 전송된다.
2. 설정 및 구현 방법
알람을 전송하는 방법은 총 3가지로서, email, sms와 webhook으로 알람을 전송 할 수 있다.
email 전송은 설정만 추가하면 기능을 사용할 수 있고, sms 전송을 하기 위해서는 직접 전송 로직을 구현해야 한다.
webhook 전송은 webhook message를 받는 webhook receiver 서비스를 별도로 준비해야한다.
webhook receiver 서비스는 샘플 프로젝트를 사용하거나 직접 구현해야 한다.
alarm 기능을 사용하려면 pinpoint-batch와 pinpoint-web를 수정해야한다. pinpoint-batch에는 alarm batch 동작을 위해서 설정 및 구현체를 추가해야 한다. pinpoint-web에는 사용자가 알람을 추가할 수 있도록 설정해야한다.
2.1 pinpoint-batch 설정 및 구현 방법
2.1.1) email/sms/webhook 전송 설정 및 구현
A. email 전송
email 전송 기능을 사용하기 위해서 batch-root.properties파일에 smtp 서버 정보와 email에 포함될 정보들을 설정해야 한다.
pinpoint.url= #pinpoint-web 서버의 url
alarm.mail.server.url= #smtp 서버 주소
alarm.mail.server.port= #smtp 서버 port
alarm.mail.server.username= #smtp 인증을 위한 userName
alarm.mail.server.password= #smtp 인증을 위한 password
alarm.mail.sender.address= # 송신자 email

ex)
pinpoint.url=http://pinpoint.com
alarm.mail.server.url=stmp.server.com
alarm.mail.server.port=587
alarm.mail.server.username=pinpoint
alarm.mail.server.password=pinpoint
alarm.mail.sender.address=pinpoint_operator@pinpoint.com
참고로
applicationContext-batch-sender.xml 파일에 email을 전송하는 class가 bean으로 등록 되어있다.
    <bean id="mailSender" class="com.navercorp.pinpoint.batch.alarm.SpringSmtpMailSender">
        <constructor-arg ref="batchConfiguration"/>
        <constructor-arg ref="userGroupService"/>
        <constructor-arg ref="javaMailSenderImpl"/>
    </bean>

    <bean id="javaMailSenderImpl" class="org.springframework.mail.javamail.JavaMailSenderImpl">
        <property name="host" value="${alarm.mail.server.url:}" />
        <property name="port" value="${alarm.mail.server.port:587}" />
        <property name="username" value="${alarm.mail.server.username:}" />
        <property name="password" value="${alarm.mail.server.password:}" />
        <property name="javaMailProperties">
            <props>
                <prop key="mail.transport.protocol">${alarm.mail.transport.protocol:}</prop>
                <prop key="mail.smtp.port">${alarm.mail.smtp.port:}</prop>
                <prop key="mail.smtp.from">${alarm.mail.sender.address:}</prop>
                <prop key="mail.smtp.auth">${alarm.mail.smtp.auth:false}</prop>
                <prop key="mail.smtp.starttls.enable">${alarm.mail.smtp.starttls.enable:false}</prop>
                <prop key="mail.smtp.starttls.required">${alarm.mail.smtp.starttls.required:false}</prop>
                <prop key="mail.debug">${alarm.mail.debug:false}</prop>
            </props>
        </property>
    </bean>
만약 email 전송 로직을 직접 구현하고 싶다면 위의 SpringSmtpMailSender, JavaMailSenderImpl bean 선언을 제거하고 com.navercorp.pinpoint.web.alarm.MailSender interface를 구현해서 bean을 등록하면 된다.
public interface MailSender {
   void sendEmail(AlarmChecker checker, int sequenceCount);
}
B. sms 전송
sms 전송 기능을 사용 하려면 com.navercorp.pinpoint.batch.alarm.SmsSender interface를 구현하고 bean으로 등록해야 한다. SmsSender 구현 class가 없는 경우 sms는 전송되지 않는다.
public interface SmsSender {
    public void sendSms(AlarmChecker checker, int sequenceCount);
}
C. webhook 전송
Webhook 전송 기능은 Pinpoint의 Alarm message를 Webhook API로 전송 할 수 있는 기능이다.
webhook message를 전송받는 webhook receiver 서비스는 샘플 프로젝트를 사용하거나 직접 구현해야 한다. Webhook Receiver 서버에 전송되는 Alarm message(이하 payload)는 Alarm Checker 타입에 따라 스키마가 다르다. Checker 타입에 따른 payload 스키마는 3.기타 - webhook 페이로드 스키마 명세, 예시에서 설명한다.
webhook 기능을 활성화 하기위해서, batch-root.properties 파일에 Webhook 전송 여부(webhook.enable)와 receiver 서버 정보(webhook.receiver.url)를 설정한다.
# webhook config
webhook.enable=true
webhook.receiver.url=http://www.webhookexample.com/alarm/
알림
webhook 기능이 추가되면서 mysql 테이블 스키마가 수정되었기 때문에, Pinpoint 2.1.1 미만 버전에서 2.1.1 버전 이상으로 업그레이드한 경우 Mysql의 ‘alarm_rule’ 테이블에 ‘webhook_send’ 컬럼을 추가해야한다.SQL : ALTER TABLE
alarm_ruleADD COLUMNwebhook_sendCHAR(1) DEFAULT NULL;
참고로
Webhook을 전송하는 클래스는 Pinpoint가 제공하는 WebhookSenderImpl가 담당한다.
WebhookSender 클래스는 Pinpoint-batch의 applicationContext-batch-sender.xml 파일에 bean으로 등록 되어있다.
<bean id="webHookSender" class="com.navercorp.pinpoint.web.alarm.WebhookSenderImpl">
    <constructor-arg ref="batchConfiguration"/>
    <constructor-arg ref="userServiceImpl"/>
    <constructor-arg ref="restTemplate" />
</bean>
2.1.2) MYSQL 서버 IP 주소 설정 & table 생성
step 1
알람에 관련된 데이터를 저장하기 위해 Mysql 서버를 준비한다.
step 2
mysql 접근을 위해서 pinpoint-batch의 jdbc-root.properties 파일에 접속 정보를 설정한다.
jdbc.driverClassName=com.mysql.jdbc.Driver
jdbc.url=jdbc:mysql://localhost:13306/pinpoint
jdbc.username=admin
jdbc.password=admin
step 3
mysql에 Alarm 기능에 필요한 table을 생성한다. table 스키마는 아래 파일을 참조한다.
2.1.3) pinpoint-batch 실행 방법
pinpoint-batch 프로젝트는 spring boot기반으로 되어있고 아래와 같은 명령어로 실행하면 된다. 빌드후 실행파일은 pinpoint-batch 모듈의 target/deploy 폴더 하위에서 확인할 수 있다.
java -Dspring.profiles.active=XXXX -jar pinpoint-batch-VERSION.jar

ex) java -Dspring.profiles.active=local -jar pinpoint-batch-2.1.1.jar
2.2 pinpoint-web 설정 방법
2.2.1) MYSQL 서버 IP 주소 설정
사용자 알람 설정을 저장하기 위해서 pinpoint-web의 jdbc-root.properties 파일에 mysql 접속 정보를 설정한다.
jdbc.driverClassName=com.mysql.jdbc.Driver
jdbc.url=jdbc:mysql://localhost:13306/pinpoint
jdbc.username=admin
jdbc.password=admin
2.2.2) webhook 기능 활성화
사용자가 알람 설정에 webhook 기능을 적용할수 있도록 batch-root.properties 파일에 webhook 기능을 활성화한다.
# webhook config
webhook.enable=true
webhook 기능을 활성화하면, 아래 그림처럼 알람 설정 화면에서 webhook을 알람 타입으로 선택할 수 있다.
3. 기타
3.1 설정, 실행, 성능
1) batch의 동작 주기를 조정하고 싶다면 applicationContext-batch-schedule.xml 파일의 cron expression을 수정하면 된다.
<task:scheduled-tasks scheduler="scheduler">
    <task:scheduled ref="batchJobLauncher" method="alarmJob" cron="0 0/3 * * * *" />
</task:scheduled-tasks>
2) alarm batch 성능을 높이는 방법은 다음과 같다. alarm batch 성능 튜닝을 위해서 병렬로 동작이 가능하도록 구현을 해놨다. 그래서 아래에서 언급된 조건에 해당하는 경우 설정값을 조정한다면 성능을 향상 시킬수 있다. 단 병렬성을 높이면 리소스의 사용률이 높아지는것은 감안해야한다.
alarm이 등록된 application의 개수가 많다면 applicationContext-alarmJob.xml 파일의 poolTaskExecutorForPartition의 pool size를 늘려주면 된다.
<task:executor id="poolTaskExecutorForPartition" pool-size="1" />
application 각각마다 등록된 alarm의 개수가 많다면 applicationContext-alarmJob.xml 파일에 선언된 alarmStep이 병렬로 동작되도록 설정하면 된다.
<step id="alarmStep" xmlns="http://www.springframework.org/schema/batch">
    <tasklet task-executor="poolTaskExecutorForStep" throttle-limit="3">
        <chunk reader="reader" processor="processor" writer="writer" commit-interval="1"/>
    </tasklet>
</step>
<task:executor id="poolTaskExecutorForStep" pool-size="10" />
3) quickstart web을 사용한다면. pinpoint web은 mockDAO를 사용하기 때문에 pinpont web의 설정들을 참고해서 기능을 사용해야한다. applicationContext-dao-config.xml, jdbc.properties.
3.2 webhook 상세
3.2.1 webhook receiver sample project
webhook receiver 프로젝트 예시
Slack-Receiver 는 Webhook Receiver의 예제 프로젝트이다. 이 프로젝트는 Pinpoint의 webhook의 알람을 받아서 Slack으로 메시지를 전송할 수 있는 스프링 부트로 구현된 서비스이다. 이 프로젝트의 자세한 사항은 해당 GitHub 저장소 를 참고하면 된다.
3.2.2 webhook 페이로드 스키마 및 예시
페이로드 스키마
Key
| Name | Type | Description | Nullable |
|---|---|---|---|
| pinpointUrl | String | Pinpoint-web의 서버 URL 주소 | O |
| batchEnv | String | Batch 서버의 환경 변수 | X |
| applicationId | String | 타겟 애플리케이션 ID | X |
| serviceType | String | 타겟 애플리케이션 서비스 타입 | X |
| userGroup | UserGroup | 유저 그룹 페이지의 유저 그룹 | X |
| checker | Checker | alarm 설정 페이지의 checker 정보 | X |
| unit | String | checker가 감지한 값의 단위 | O |
| threshold | Integer | 설정된 시간동안 체커가 감지한 값의 임계치 | X |
| notes | String | 알람 설정 페이지의 notes | O |
| sequenceCount | Integer | 알람 발생 횟수 | X |
UserGroup
| Name | Type | Description | Nullable |
|---|---|---|---|
| userGroupId | String | 유저 그룹 페이지의 유저 그룹 ID | X |
| userGroupMembers | UserMember[] | 특정 유저 그룹의 멤버 정보 | X |
Checker
| Name | Type | Description | Nullable |
|---|---|---|---|
| name | String | 알람 설정 페이지의 checker 이름 | X |
| type | String | 체커가 감지한 값의 추상 타입, 다음 중 하나에 해당됨 “LongValueAlarmChecker” 타입은 “Slow Count”, “Slow Count”, “Slow Rate”, “Error Count”, “Error Rate”, “Total Count”, “Slow Count To Callee”, “Slow Rate To Callee”, “Error Count To Callee”, “Error Rate To Callee”, “Total Count to Callee”의 추상 타입에 속한다. “LongValueAgentChecker” 타입은 “Heap Usage Rate”, “Jvm Cpu Usage Rate”, “System Cpu Usage Rate”, “File Descriptor Count”의 추상타입이다. “BooleanValueAgentChecker” 타입은 “Deadlock or not”의 추상 타입이다. “DataSourceAlarmListValueAgentChecker” 타입은 “DataSource Connection Usage Rate”의 추상타입이다. |
X |
| detectedValue | Integer or DetectedAgent[] | Checker가 감지한 값 “LongValueAlarmChecker”, “detectedValue” 타입은 Integer 타입이다. “LongValueAlarmChecker”, “detectedValue”이 아닌 타입은 DetectedAgents[] 타입 이다. |
X |
UserMember
| Name | Type | Description | Nullable |
|---|---|---|---|
| id | String | 멤버의 id | X |
| name | String | 멤버의 name | X |
| String | 멤버의 email | O | |
| department | String | 멤버의 department | O |
| phoneNumber | String | 멤버의 phone number | O |
| phoneCountryCode | String | 멤버의 phone country code | O |
DetectedAgent
| Name | Type | Description | Nullable |
|---|---|---|---|
| agentId | String | Checker가 감지한 에이전트 ID | X |
| agentValue | Integer or Boolean or DataSourceAlarm[] |
체커가 감지한 에이전트의 값 “LongValueAgentChecker”, “agentValue” 은 Integer 타입이다. “BooleanValueAgentChecker”,“agentValue” 은 Boolean 타입이다.. “DataSourceAlarmListValueAgentChecker”, “agentValue”은 DataSourceAlarm[] 타입이다. |
X |
DataSourceAlarm
| Name | Type | Description | Nullable |
|---|---|---|---|
| databaseName | String | 애플리케이션에 접속한 데이터베이스 이름 | X |
| connectionValue | Integer | Applicaiton의 DataSource내의 Connection 사용률 | X |
webhook Payload 예제
LongValueAlarmChecker
{
 "pinpointUrl": "http://pinpoint.com",
 "batchEnv": "release",
 "applicationId": "TESTAPP",
 "serviceType": "TOMCAT",
 "userGroup": {
   "userGroupId": "Group-1",
   "userGroupMembers": [
     {
       "id": "msk1111",
       "name": "minsookim",
       "email": "pinpoint@naver.com",
       "department": "Platform",
       "phoneNumber": "01012345678",
       "phoneCountryCode": 82
     }
   ]
 },
 "checker": {
   "name": "TOTAL COUNT",
   "type": "LongValueAlarmChecker",
   "detectedValue": 33
 },
 "unit": "",
 "threshold": 15,
 "notes": "Note Example",
 "sequenceCount": 4
}
LongValueAgentChecker
{
 "pinpointUrl": "http://pinpoint.com",
 "batchEnv": "release",
 "applicationId": "TESTAPP",
 "serviceType": "TOMCAT",
 "userGroup": {
   "userGroupId": "Group-1",
   "userGroupMembers": [
     {
       "id": "msk1111",
       "name": "minsookim",
       "email": "pinpoint@naver.com",
       "department": "Platform",
       "phoneNumber": "01012345678",
       "phoneCountryCode": 82
     }
   ]
 },
 "checker": {
   "name": "HEAP USAGE RATE",
   "type": "LongValueAgentChecker",
   "detectedValue": [
     {
       "agentId": "test-agent",
       "agentValue": 8
     }
   ]
 },
 "unit": "%",
 "threshold": 5,
 "notes": "Note Example",
 "sequenceCount": 4
}
BooleanValueAgentChecker
{
 "pinpointUrl": "http://pinpoint.com",
 "batchEnv": "release",
 "applicationId": "TESTAPP",
 "serviceType": "TOMCAT",
 "userGroup": {
   "userGroupId": "Group-1",
   "userGroupMembers": [
     {
       "id": "msk1111",
       "name": "minsookim",
       "email": "pinpoint@naver.com",
       "department": "Platform",
       "phoneNumber": "01012345678",
       "phoneCountryCode": 82
     }
   ]
 },
 "checker": {
   "name": "DEADLOCK OCCURRENCE",
   "type": "BooleanValueAgentChecker",
   "detectedValue": [
     {
       "agentId": "test-agent",
       "agentValue": true
     }
   ]
 },
 "unit": "BOOLEAN",
 "threshold": 1,
 "notes": "Note Example",
 "sequenceCount": 4
}
DataSourceAlarmListValueAgentChecker
{
 "pinpointUrl": "http://pinpoint.com",
 "batchEnv": "release",
 "applicationId": "TESTAPP",
 "serviceType": "TOMCAT",
 "userGroup": {
   "userGroupId": "Group-1",
   "userGroupMembers": [
     {
       "id": "msk1111",
       "name": "minsookim",
       "email": "pinpoint@naver.com",
       "department": "Platform",
       "phoneNumber": "01012345678",
       "phoneCountryCode": 82
     }
   ]
 },
 "checker": {
   "name": "DATASOURCE CONNECTION USAGE RATE",
   "type": "DataSourceAlarmListValueAgentChecker",
   "detectedValue": [
     {
       "agentId": "test-agent",
       "agentValue": [
                 {
                     "databaseName": "test",
                     "connectionValue": 32
                 }
        ]
     }
   ]
 },
 "unit": "%",
 "threshold": 16,
 "notes": "Note Example",
 "sequenceCount": 4
}